
Position sizing sits at the core of long-term trading success. Many new traders jump into the market with excitement, yet they rarely ask the question that actually decides their future: How much should I risk on this trade? Although the market creates endless opportunities, your account survives only when your risk stays under control. Because of that, position sizing becomes the shield that guards your capital and shapes every decision you make. When you understand it deeply, you stop trading based on emotion and start trading with intention.
What Position Sizing Really Means
Position sizing simply answers how many units of an asset you should trade. It isn’t about predicting the market. Instead, it helps you decide the right amount to buy or sell so your capital stays safe. When you cook, you follow a recipe because too much of one ingredient ruins the dish. Trading works the same way. When you trade too big, losses hit you hard. When you trade too small, your winners barely matter. Proper position sizing balances risk and reward so your account grows steadily.
Additionally, it supports discipline. Once you define your risk before entering a trade, you remove guesswork and emotional impulses. Many traders don’t realize that even great strategies fail when position sizing is ignored. Meanwhile, average strategies can outperform when paired with smart risk management. Professional traders know this, which is why they treat position sizing as the backbone of their work.
Why the 1–2% Rule Matters
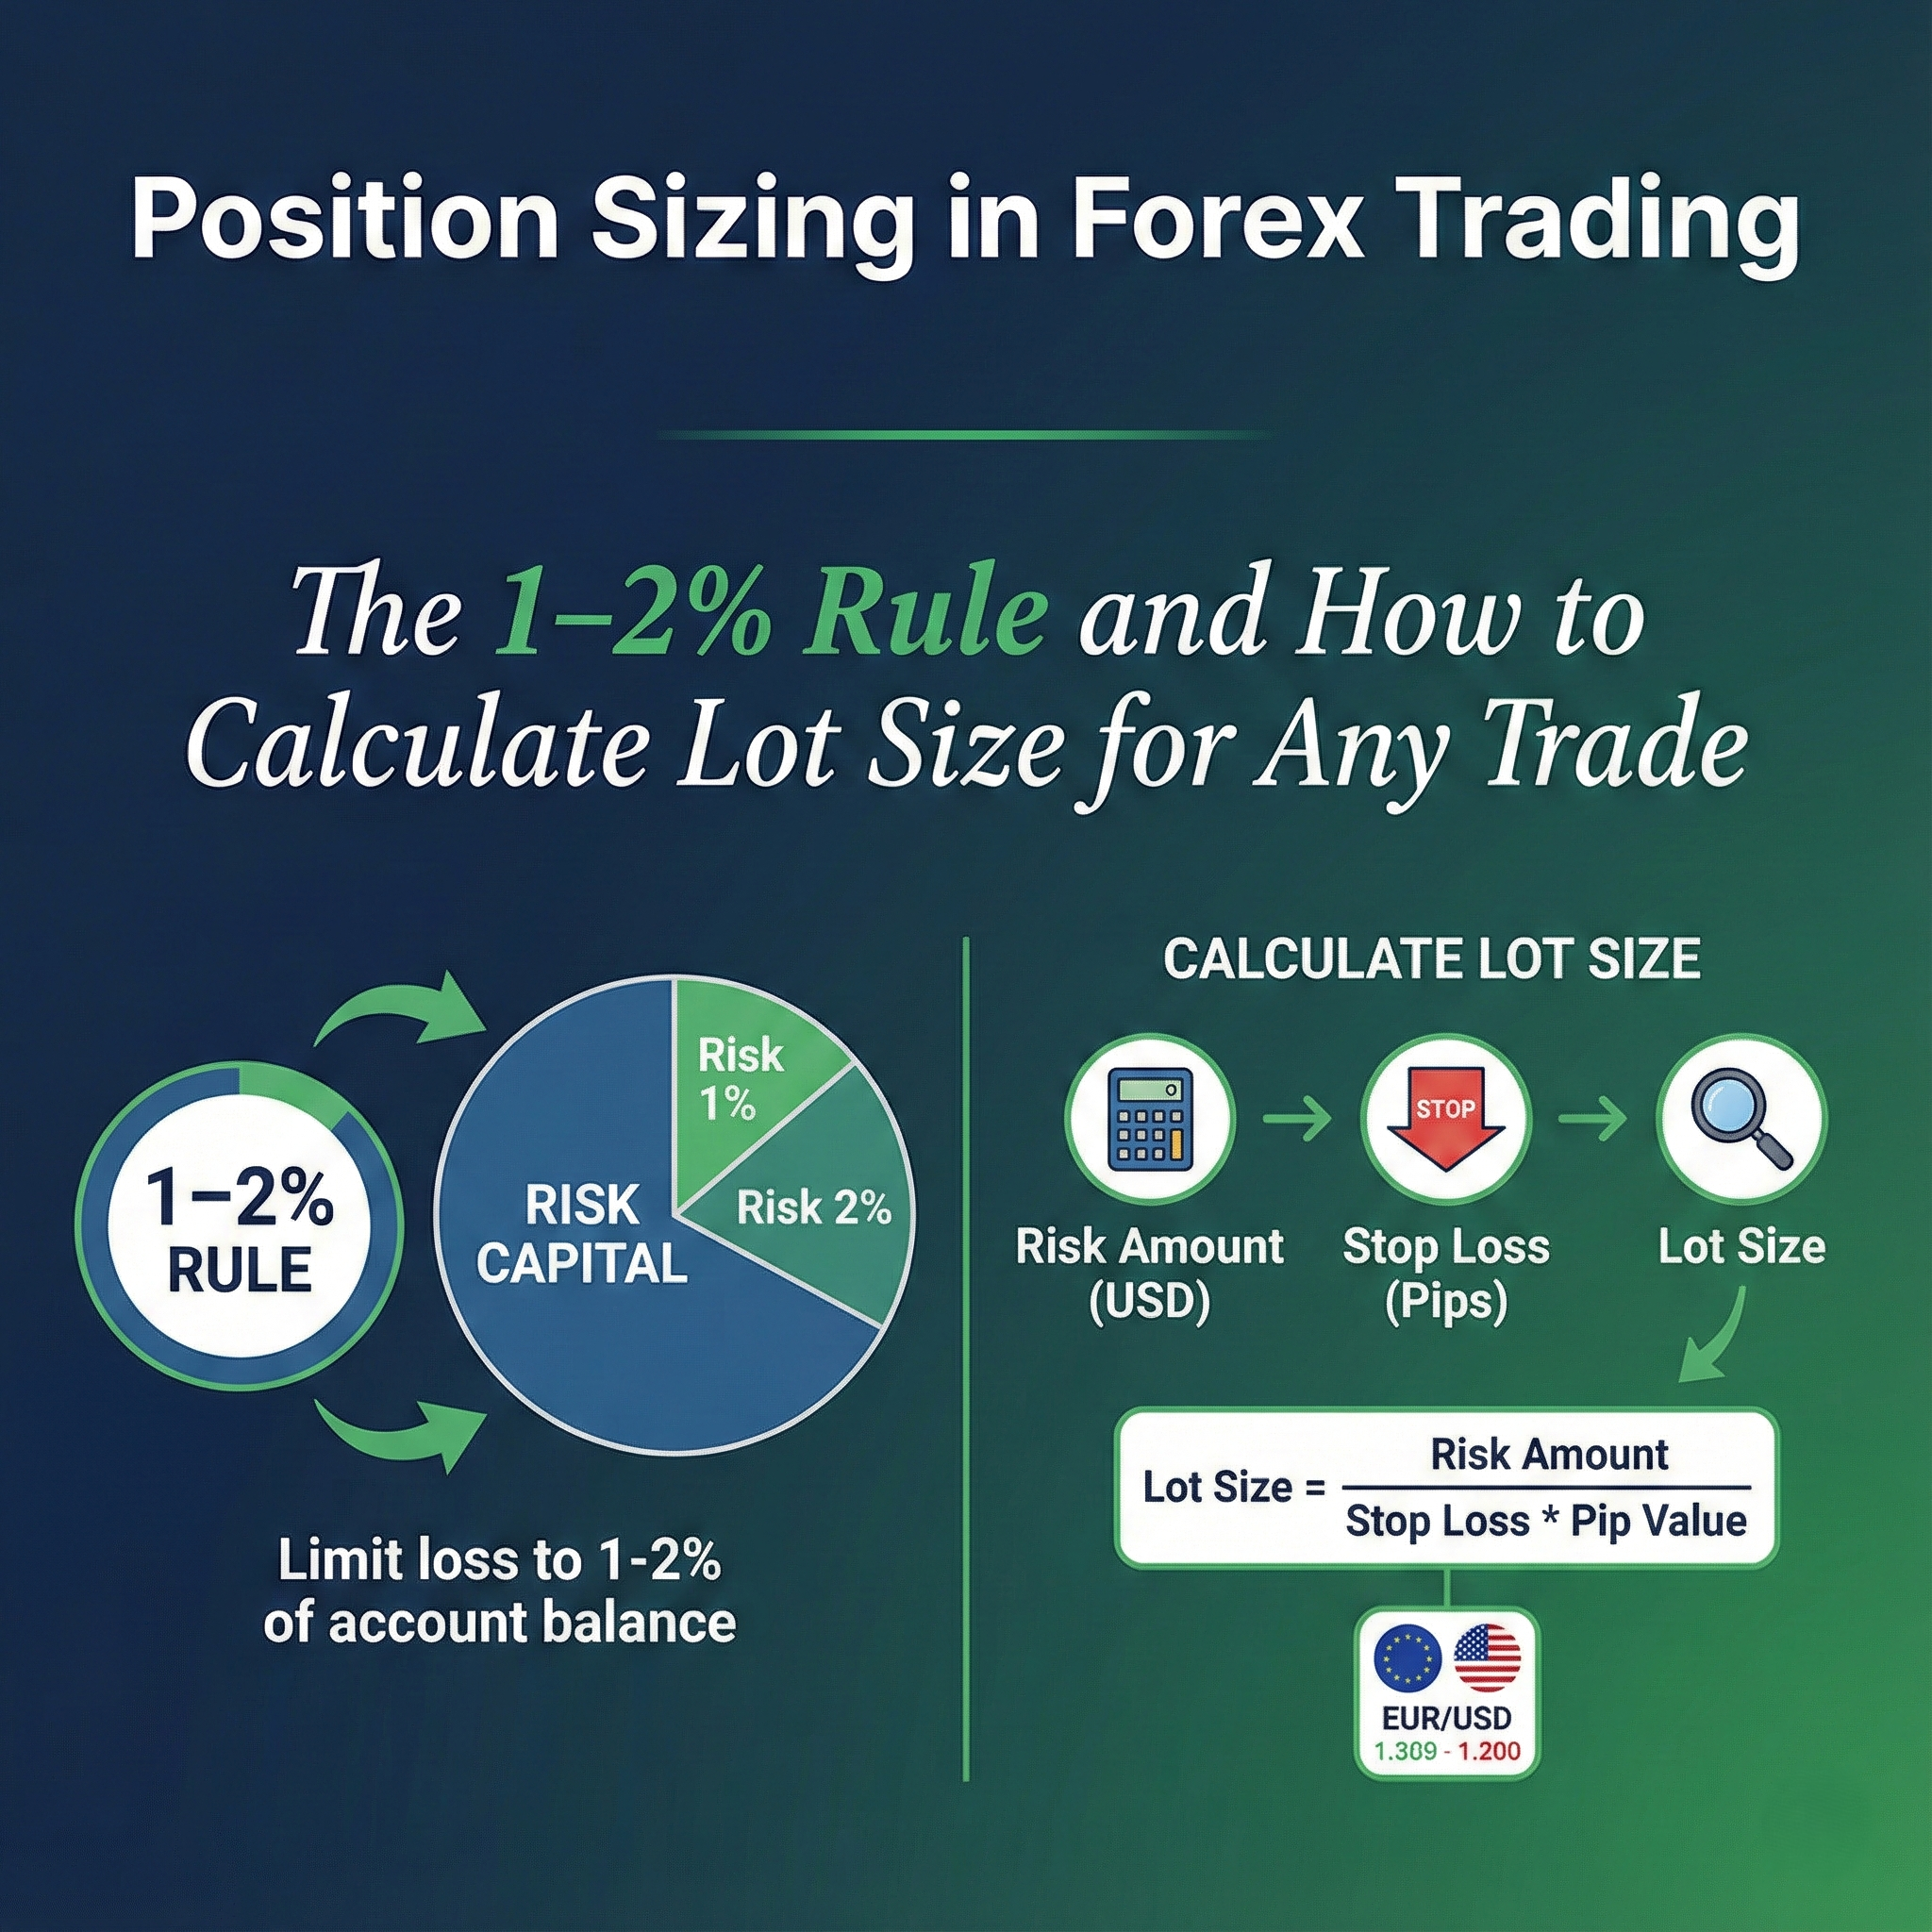
The 1–2% rule is one of the most reliable risk principles in trading. According to this guideline, you should risk no more than 1% or 2% of your account on a single trade. For example, if you have $10,000, risking 1% means your maximum loss is $100. Risking 2% puts your maximum loss at $200. Because this rule limits the damage from losing streaks, your account stays alive long enough for winning trades to recover your losses.
Consider two traders during a five-trade losing streak. The first risks only 2% per trade. The second risks 10%. After five losses, the first trader’s $10,000 account drops to around $9,039, which is manageable. The second trader ends up near $5,905. Even though both faced the same number of losses, the second trader now needs a huge recovery just to reach breakeven.
Furthermore, the rule prevents emotional decisions. When you commit to a percentage-based risk, you no longer increase size simply because a setup “feels” good. Instead, math sets the limit. As a result, you stay consistent even when confidence rises or fear creeps in.
Beginners benefit the most from this rule. Many professionals even suggest starting with 0.5% or less. When new traders learn with tiny risk, they protect their confidence during losing periods. As skills grow, they can move toward the full 1–2% range. This slow approach mirrors how athletes train: they start light, build strength, and then increase intensity.
Key Components Behind Every Position Size Calculation
Before you calculate position size, you need four simple pieces of information. These parts work together, and missing one piece causes mistakes.
1. Account Equity
Account equity is the total value of your trading account at any moment. It changes after every win and loss. Because the number reflects your true capital, you must use your current equity every time you calculate risk. This habit prevents you from risking too much after a big loss or too little after a big win.
2. Risk Percentage
Next, choose the percentage of your account you’re willing to lose on a single trade. As discussed earlier, most traders stay between 1% and 2%. For example, risking 2% on a $10,000 account means your maximum loss is $200. When you multiply equity by your risk percentage, you get your dollar risk for the trade.
3. Stop-Loss Level
Your stop loss defines where you exit if the trade moves against you. This level protects your account from uncontrolled losses. Ideally, you place your stop at a logical technical point, such as below support or above resistance. The distance between your entry and stop creates your risk per pip or per share.
4. Pip Value or Risk Per Unit
Finally, figure out how much money you lose per pip, point, or share. In forex, pip value depends on the pair and lot size. In stocks, it’s simply the difference between entry price and stop price. Once you know this number, the rest becomes straightforward.
The Simple Formula That Decides Position Size
The basic position sizing formula is:

This formula is simple, which is why many traders ignore its power. Yet it determines exactly how much you should trade so your loss never exceeds your limit.
Imagine you have $20,000 and risk 2%. That gives you a $400 maximum loss. You enter a stock at $50 with a stop at $45. Because your risk per share is $5, you divide $400 by $5. The result tells you to trade 80 shares. If the stock hits the stop, you lose exactly $400. Because this amount fits your risk plan, you remain in control.
Moreover, this formula works for every market, including forex, futures, options, and crypto. Professionals always start with risk; beginners often start with size. When you build size based on risk, you protect yourself regardless of market conditions.
How to Calculate Position Size in Forex
Forex uses lots instead of shares, which adds one extra step. However, the logic remains the same.
Assume you have a $5,000 account and risk 1%. That gives you a $50 maximum loss. You want to trade EUR/USD with a 50-pip stop. One micro lot usually creates about $0.10 per pip. Therefore, 50 pips equal a $5 loss per micro lot. To risk $50, you divide $50 by 50 pips and get $1 per pip. Because one micro lot pays $0.10 per pip, you need ten micro lots. This equals one mini lot.
Although the numbers change from pair to pair, the logic stays identical. When you master this process, forex sizing becomes simple.
Why Stop-Loss Distance Changes Your Position Size
Your stop-loss distance plays a major role in your position size. Because of that, you must adjust size when volatility expands or contracts.
For instance, a stock with a $2 stop allows more shares than a stock with a $5 stop. When your stop is wider, your position size must shrink to keep your risk steady. Many traders forget this rule and trade the same size in every market condition. Consequently, they take oversized trades during volatile periods and see losses spiral out of control.
When you adjust stop loss and size together, you trade with the market instead of against it. Volatile markets demand small positions. Calm markets let you increase your size comfortably.
How Risk-to-Reward Ratios Interact With Position Size
Risk-to-reward ratios tell you how much you stand to gain compared to how much you risk. A 1:2 ratio means you aim for double your risk. Because position size must follow your risk limit, your risk-to-reward ratio doesn’t increase your size, but it strengthens your strategy.
Imagine two traders. Both win 50% of their trades. Trader A uses a 1:1 ratio and breaks even after 100 trades. Trader B uses a 1:2 ratio and earns a strong profit over the same number of trades. The difference isn’t their win rate but the quality of their reward targets.
When you combine smart position sizing with strong risk-to-reward ratios, you gain an edge that compounds over time.
Common Position Sizing Mistakes That Harm Traders
Many traders slip into predictable traps. Because these traps ruin accounts quickly, you must learn to avoid them early.
Overleveraging
This mistake occurs when traders risk more than their rules allow. They often feel confident and increase size, but the market punishes this behavior. One large loss can undo weeks of progress.
Ignoring Volatility
Some traders keep the same stop-loss distance in every market environment. During volatile sessions, their tight stops trigger immediately. During quiet periods, their wide stops create unnecessary risk. When volatility shifts, your stop and position size must shift too.
Ignoring Correlation
If you buy several assets that move in the same direction, you increase your true risk even if each trade meets your rules. For example, buying three tech stocks at once creates concentrated exposure. When the sector drops, all positions fall together. Diversifying across uncorrelated assets helps reduce this problem.
Overtrading
Opening too many trades divides your attention and weakens your discipline. As the number of open trades grows, risk management becomes harder. Therefore, limit your active positions and choose quality over quantity.
Moving the Stop
A stop loss protects your plan. When traders remove or move stops, they allow one losing trade to spiral into disaster. This mistake destroys accounts faster than any other error.
How Account Size Shapes Your Position Sizing Choices
Your account size influences your trading options. Because of this, traders with small accounts must adjust differently from those with large accounts.
Small Accounts
With $500 to $2,000, your risk per trade often becomes very small. Stock trading becomes difficult because your position sizes shrink too much. Therefore, many small-account traders prefer forex or futures micro contracts because these allow flexible sizing.
Medium Accounts
With $5,000 to $20,000, position sizing becomes comfortable. You can trade multiple positions while still controlling risk. Many traders reach consistency at this level because the size feels more natural.
Large Accounts
Large accounts offer more freedom. A trader with $50,000 or more can risk $500 per trade at 1% and still diversify. Additionally, these traders can place more swing or position trades without stressing about capital limits.
An Advanced Method: The Kelly Criterion
The Kelly Criterion calculates the mathematically optimal risk percentage based on win rate and reward-to-risk ratio. Although the full Kelly number is often too aggressive for real trading, fractional Kelly provides useful guidance.
For example, if your system wins 60% of the time and averages a 3:1 ratio, the Kelly formula may suggest risking around 47%. Clearly that percentage is too high for normal trading. However, using 25% of the Kelly value gives you a more realistic risk level. The method works only when you have strong backtesting data. New traders should avoid it until they build reliable statistics.
Position Sizing for Different Trading Styles
Trading style influences how you size your positions. Because each style faces different risks, your approach must adjust as well.
Day Traders
Day traders use tight stops and close trades quickly. They often use the full 1–2% risk because the market moves fast, and losses remain small due to quick exits. Because they take several trades per day, they must track cumulative risk.
Swing Traders
Swing traders hold positions longer, so stops must be wider. As a result, swing traders often drop to 0.5% or 1% risk per trade. Their position sizes shrink, but their trade duration gives them larger potential moves.
Position Traders
These traders hold for weeks or months. Because their stops sit far away, they often use 0.25% to 0.5% risk. Their goal is stability, not speed.
Scalpers
Scalpers use extremely tight stops and take many trades. Although they risk 1–2% on each trade, they monitor daily loss limits closely to avoid a blowout.
A Full Example of the Position Sizing Process
Imagine you have $15,000 and risk 1.5%. Your maximum loss becomes $225. You want to buy Apple at $180 with a stop at $174.50. The risk per share is $5.50. When you divide $225 by $5.50, you get around 40 shares. Because you can’t buy fractional shares, you round down. The final risk equals $220.
Next, you identify a take-profit level at $192. This target is $12 above entry. Your risk-to-reward ratio becomes roughly 1:2.2. Once everything checks out, you execute the trade. If you win, your account rises. If you lose, you stay within your limit.
After the trade closes, you update your equity and repeat the process. Each trade becomes part of a larger system that protects your capital and builds consistency.
How to Apply Position Sizing Consistently
Consistency separates good traders from lucky ones. Because of that, you need a reliable routine.
Use a calculator or spreadsheet. This prevents mistakes and speeds up your process.
Write down your rules. Keeping them visible reinforces discipline.
Record every trade. This habit reveals behavioral patterns.
Avoid raising risk too quickly. Increases should happen only after long periods of consistent results.
Prepare for drawdowns. When losing streaks appear, your rules protect you from impulsive reactions.
Adjusting Position Size as Your Account Grows
As your account grows, your dollar risk increases naturally if your percentage stays the same. For example, 1% of $10,000 is $100, but 1% of $11,000 is $110. Because this adjustment happens automatically, you scale smoothly as your skill improves.
If your account drops during a drawdown, you may temporarily reduce your risk percentage. This protects you while you regain consistency. Some traders even cut their risk in half during difficult periods.
Conclusion: Why Position Sizing Is Your Most Important Trading Tool
Position sizing protects your capital, supports discipline, and creates long-term stability. Although strategies and indicators change over time, risk control never loses relevance. When you base every trade on a clear risk percentage and a logical stop loss, you create a system that allows you to survive losing streaks and benefit from winning streaks.
Your journey toward consistent trading begins with a single well-sized trade. When you repeat that process day after day, your discipline strengthens and your results improve. Eventually, position sizing becomes automatic, and you trade with clarity instead of fear.
Leave a Reply